Paper Quality Optimization for Developers
This demonstration video was done in v5.5.
There may be slight differences with the latest version.
Check the latest documentation for the specific tasks should any feature not quite work as expected.
The Paper Quality Optimization is also known as Multi-Objective Optimization with Machine Learning.
This is the Developer edition of a 4 part tutorial on turning an inhouse machine learning program developed in a Jupyter Notebook into a scalable solution for deployment to the edge in a Kelvin Instance;
- Overview - Gives an overview workflow over all three detailed tutorials. Especially good for the non-technical who just want to have an understanding how to integrate and scale an inhouse developed machine learning program using Kelvin.
- Developer - Detailed walk through to take a Jupyter Notebook containing an inhouse machine learning model program and integrating it as a Kelvin SmartApp™ ready for upload and deployment to the edge.
- Platform Administrator - Detailed walk through to manage all administrative matters for the tutorial example for the Units, Asset Types, Assets, Data Streams, Connections, Upload to App Registry.
- Process Engineer - Detailed walk through to add Assets to Kelvin SmartApps™, monitor the performance of the Assets and take action on new Recommendations.
Video Tutorial
This tutorial is also in a video format, so you can choose your preferred medium to understand more about Kelvin.
Chapters In Video
- Introduction
- Overview of the Developer's journey
- The jupyter notebook
- Create the Kelvin SmartApp™
- From Jupyter Notebook to Python files
- Add custom code to main.py
- Add libraries to requirements.txt
- Edit app.yaml file
- Test the program locally
- Preview Platform Administrator tutorial
Requirements
For this tutorial you will need to have the following tasks completed first;
- Installed the kelvin-sdk onto your computer.
- Have access to a Kelvin Instance and logged into the Kelvin Instance in the Terminal.
- Clone the Kelvin example from github. This is a fully functional App ready for local testing.
For this tutorial we will only need three files from the github example; the multi_objective_optimization.py and rolling_window.py programs and the csv\data.csv test data.
These files are assumed to be your machine learning program you want to use in a Kelvin Instance. The test data is assumed to be your data for testing the App locally before you upload to the Cloud.
Introduction
Briefly, the example is monitoring key set point inputs and paper quality check outputs data in a paper mill press line from the steam boiler, dryer, refiner, forming line, press and paper quality.
A machine learning model fits the input and output data to four random forest regression models, one for each output. Each of the four resulting objective functions are put through a generic algorithm (NGSA II) to find the optimized input set points.
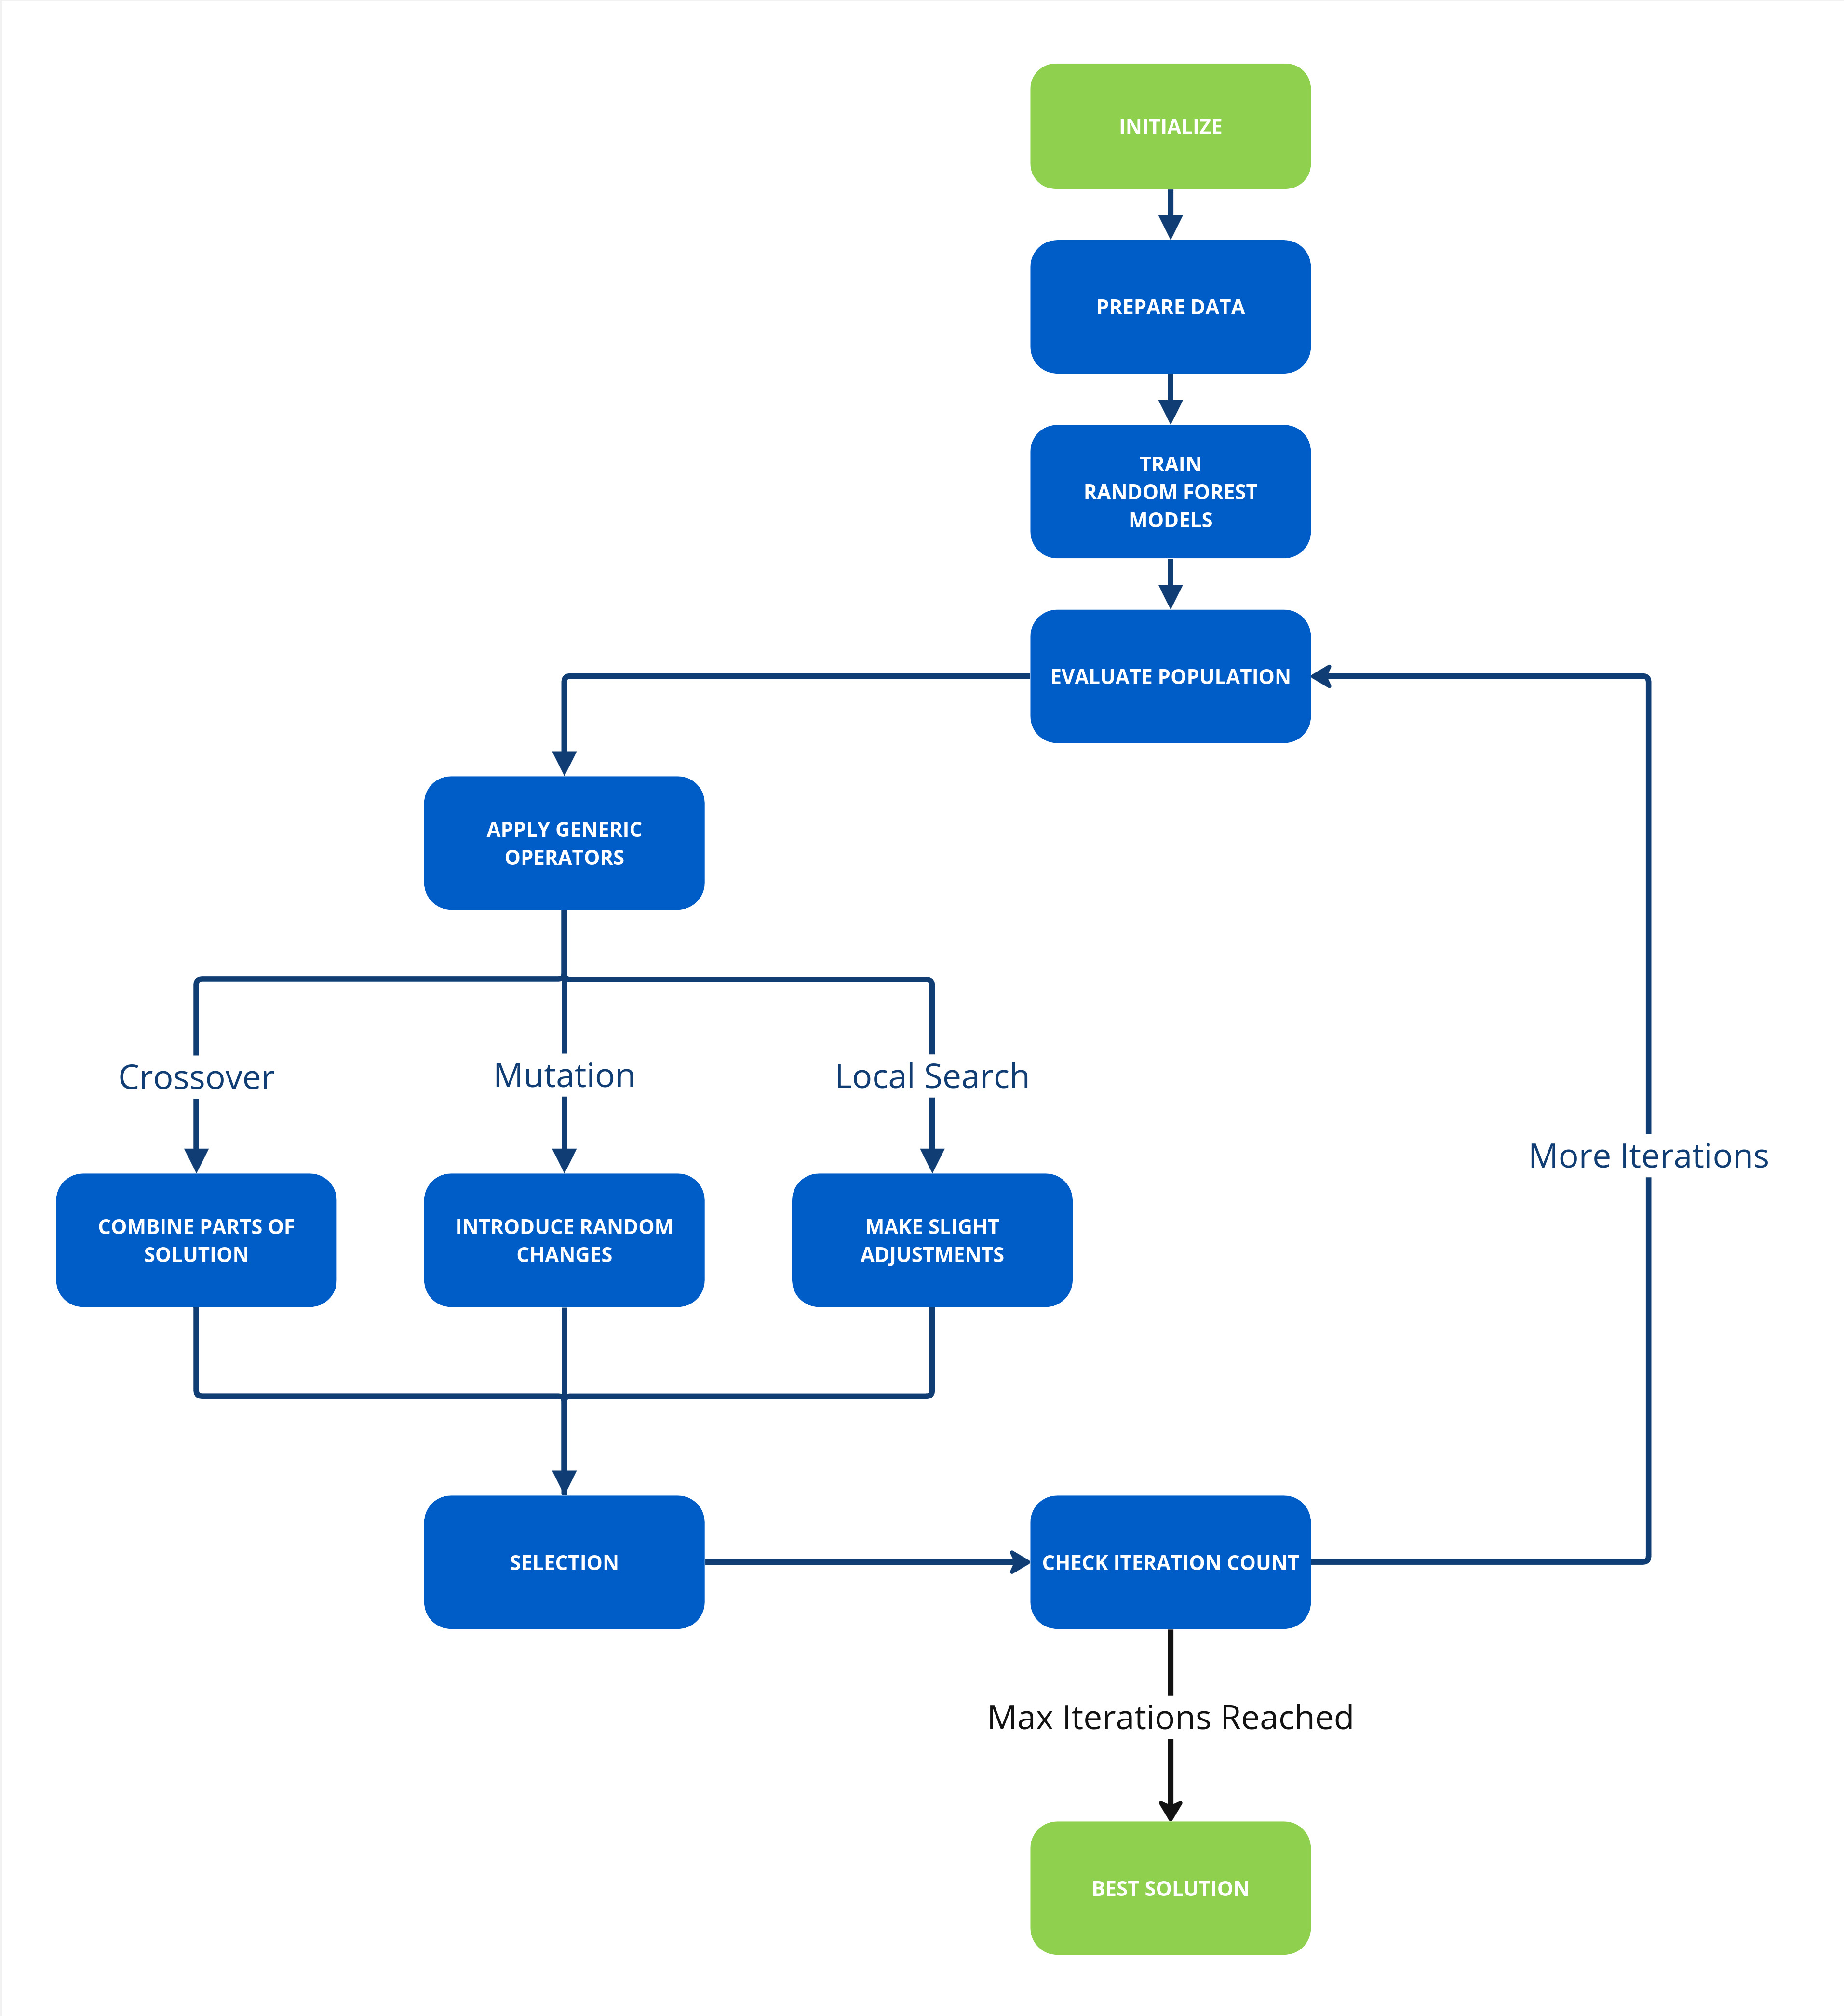
The aim of the Multi-Objective Optimization with Machine Learning example is to demonstrate how easy it is to embed your machine learning Python program into an App, connect it to live data and send Recommendations to the Operations Engineers.
In this tutorial you will learn how to;
- Create a new App
- Import your machine learning Python Kelvin SmartApps™
- Write the Kelvin SmartApp™
- Setup the logic to connect your ML to the data stream
- Create Control Changes and Recommendations from your ML output
- Update requirements.txt file
- Update app.yaml file
- Test your App locally
With that, let's get started !
Creating an App
First create a new blank folder and create a new App and type in the name of the App when asked.
This will create a new folder and fill it with a blank App structure.
Import your Machine Learning Code
Machine Learning Code
In the video tutorial we have shown you the original Jupyter Notebook used by the Data Scientist to create and test a new machine learning model.
You can find the Jupyter Notebook in Kelvin's github example repository that you have cloned.
In this step we will assume that you are familiar with the process of copying all the code from a Jupyter Notebook into a Python file, including all the machine learning code contained within functions and declarations.
You will find the Jupyter Notebook to python file we have already created called multi_objective_optimization.py in the cloned repository. Copy this file into the new folder you created.
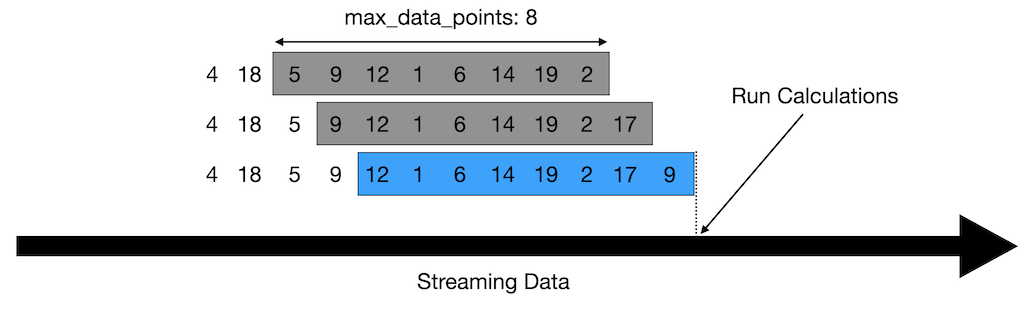
Rolling Window Code
In the Jupyter Notebook we have assumed the data fed to the machine learning model is a full snapshot of data to process which is in the csv file.
In real life conditions, the data is coming into our program as a stream of live data.
So we will need to implement a rolling window program to process the incoming data and create a timeseries snapshot of data that will be passed to the machine learning model functions for processing.
You can find a tutorial and the code on Rolling Window programming in Kelvin's github example repository.
You will find the Jupyter Notebook to python file we have already created called rolling_window.py in the cloned repository. Copy this file into the new folder you created.
Write the Kelvin SmartApp™
Now we need to write the main Python program to utilize the machine learning and rolling window program.
A blank main.py file will look like this;
| Kelvin SmartApp™ Default Code Example | |
|---|---|
As you can see the Python program is already setup to instantiate and connect to the Kelvin Cloud and to run an infinite loop.
We will use this template and do the following;
- Import our machine learning code
- Connect our program to receive live data and process it into windows of data
- Run our machine learning model
- Create Control Changes and Recommendations if the output of the machine learning model recommends new settings
Import Machine Learning Files
We start with importing our two machine learning files we created (well, actually copied from the clones repository) earlier.
| Machine Learning Libraries | |
|---|---|
Connect to the Live Data
The input and output data needs to be declared as Asset / Data Stream pairs to be able to connect the program to the live data in the Cloud.
The Data Stream names are declared in the App's app.yaml file and the Asset names are declared at runtime when an Asset is added to Kelvin SmartApps™.
We will setup the app.yaml file later in the tutorial
So here we only need to subscribe to the Asset / Data Stream pairs.
| Subscribe Asset / Data Streams Pair | |
|---|---|
We will also instantiate a RollingWindow object and assigning it to the variable rolling_window.
| Rolling Window | |
|---|---|
Within the infinite loop part of the program we will first wait for new data to arrive for our Asset / Data Stream pair;
| Await New Messages From Queue | |
|---|---|
Then we add this new data to the rolling window, find out what asset we are working on and retrieve a snapshot of data as a DataFrame from the RollingWindow class associated with our wanted asset.
| Add Data to Rolling Window | |
|---|---|
Up to this stage your main.py code should look like this;
Machine Learning Model
Now that the main declarations and data retrieval and cleaning has been done, let's move onto the machine learning model.
To keep the code clean and also wrap our machine learning model in an error handling mechanism we will put the model and output processing code in another function and call this function from our infinite loop;
And in the infinite loop after retrieving the DataFrame with rolling data for an asset, we will call the function and wait for it to finish before moving on.
Control Changes and Recommendations
Finally we will process the output of the machine learning program.
If there are new settings to send as recommendations in the Kelvin UI, then we will create Control Change instructions for each set point that needs to be updated and the wrap all the Control Changes in a Recommendation.
If the Recommendation is accepted in the Kelvin UI, then Kelvin will automatically process all the Control Changes we have created and send the new data values to the associated Asset / Data Stream pairs.
The acceptance process in the Kelvin UI is demonstrated in detail in the Multi-Objective Optimization with Machine Learning for Operations.
You can also see a brief overview of the process in the Multi-Objective Optimization with Machine Learning tutorial.
Firstly let's process the model's output to make Control Changes. For the Control Change we need to assign three variables;
- The Asset / Data Stream pair to update
- The value to update to
- The expiration date when a write will be declared a failure
As this is a multi-objective optimization there could be a whole array of set points that need updating, so we will loop through the output and create one Control Change per set point value and save them to an array called control_changes.
All the Control Changes are now wrapped into one Recommendation. When the Recommendation is created it will automatically appear in the Kelvin UI.
| Create Recommendation with Control | |
|---|---|
Complete Code
The main.py is now complete and if you should have successfully create the full code like this;
Update requirements.txt File
Next we will update the requriements.txt file to ensure all required libraries are install in our App.
Looking at all our imports in all three program files we have created see that we should end up with the file contents looking like this;
If you want, you can fix the version number of the library to install
Update app.yaml File
In the app.yaml file we need to add all the Data Streams that we want to read/write data.
In the Kelvin UI this will be linked to as Asset to create the Asset / Data Stream pairs that we montior. We only need to declare here the Data Stream part.
We also will update the Description of this App so that is has a friendly name to read in Kelvin SmartApps™ section in the Kelvin UI. The friendly name can have special characters and spaces,
In full the app.yaml file should now look like this.
Test App Locally
Now that the coding is complete, before we upload the App to the App Registry in the Cloud we can test the app locally with simulation data to ensure it is working.
For this you will need to have two terminals open, both pointing to the folder that has our App.
- Terminal 1 - This will run a simulation Cloud server which can serve data to your App and also receive and show on the screen all requests send from your program. You can use the printouts to analyze the requests and make sure your code is working properly.
- Terminal 2 - This will run your python program as an App just like any normal Python program.
Terminal 1
Before we start, we need to have a csv file with all the simulation data we want to send to the App.
We will use the same data the Data Scientist used for his Jupyter Notebook.
So, from the cloned repository copy the csv folder which contains the data.csv to our current folder.
The header of the csv file is used by the simulation Cloud server as the Data Stream names.
The data.csv file looks something like this;
With the data.csv file available we can now start the simulation Cloud server;
| Kelvin SDK Command Line Example | |
|---|---|
The response will look like this;
| Kelvin SDK Command Line Output | |
|---|---|
If all is ok, then the simulator will then respond with a Publisher started. response.
Terminal 2
We are now ready to test our program. We run it like any normal Python program.
| Run Python Example | |
|---|---|
Testing
With the testing started, you can see here how each terminal will respond.

Conclusion
In this part of the Multi-Objective Optimization with Machine Learning, we have shown you how to start from a Jupyter Notebook and end up with a fully tested Kelvin SmartApp™ ready for upload and deployment.
You can also checkout the other tutorials related to this one;
- Multi-Objective Optimization with Machine Learning Overview : A fast run through from creating the Kelvin SmartApp™, upload to the App Registry, deployment to the edge and managing Recommendations.
- Multi-Objective Optimization with Machine Learning for Developers : A detailed step-by-step process to go from a jupyter Notebook concept machine learning model to a fully tested Kelvin SmartApp™ ready for upload to the Cloud.
- Multi-Objective Optimization with Machine Learning for Platform Administrators : A detailed step-by-step process to setup the Instance with all required Assets and Data Streams, add a Connection to connect and read/write data to Assets and Upload the Kelvin SmartApp™ to the App Registry.
- Multi-Objective Optimization with Machine Learning for Operations : A detailed step-by-step process to Add Assets to Kelvin SmartApps™, monitor Kelvin SmartApps™ and Asset performance and respond to Recommendations fron Kelvin SmartApps™.